Introduction: Erpnext documentation
Erpnext documentation is a robust open-source Enterprise Resource Planning (ERP) system that provides businesses with a powerful platform to streamline their operations. One of the fundamental tasks in Erpnext documentation is the creation of items, which encompass products, services, raw materials, and any other tangible or intangible assets your business deals with. A well-organized item management process is crucial for maintaining accurate inventory, optimizing procurement and sales, and enabling efficient financial management. In this unique and detailed guide, we will walk you through the step-by-step process of creating items in ERPNext, providing in-depth explanations for each field.
Step 1: Accessing the Items Module
To start creating items in Erpnext documentation, you must first access the Items module. Log in to your Erpnext documentation account using the appropriate credentials. Upon successful login, navigate to the "Desk" icon located at the top left corner of the screen. Click on it to access the main control center. Within the Desk, locate and select the "Items" icon, typically represented by a briefcase. This action will open the Items module, and you will be ready to proceed with item creation.
Step 2: Creating a New Item
Within the Items module, you'll find a list of existing items if any have been created previously. To add a new item, click on the "+ New" button situated on the right side of the screen. By clicking this button, a blank form will appear, providing you with a fresh canvas to input the details of the new item.
Step 3: Basic Information
The initial set of information you need to provide pertains to the basic attributes of the item. Here's a breakdown of each field:
Item Code: This unique code serves as the identifier for the item within your ERP system. Carefully choose a code that is distinct and meaningful, as it will be used in various processes throughout the system.
Item Group: Select the appropriate group that categorizes the item. Organizing items into groups helps with easy classification and simplifies inventory management. Common item groups might include "Electronics," "Furniture," "Raw Materials," or any other relevant categories.
Item Name: Provide a descriptive name for the item. The item name should be easily recognizable and informative for both you and your team members.
Description: Add a detailed description of the item, including its features, specifications, and potential use cases. This comprehensive description ensures that everyone accessing the item record gains a clear understanding of its purpose and attributes.
Step 4: Stock Settings
If the item is a physical product that requires inventory tracking, you'll need to configure the stock-related parameters:
Is Stock Item: Check this box if the item is to be tracked in your inventory. This setting is essential to distinguish between items that require stock management and those that don't.
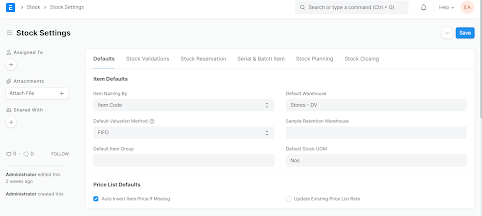
Stock UOM (Unit of Measure): Specify the default unit in which the item will be stocked in your inventory. Select a unit that aligns with your business's stocking processes and facilitates accurate stock management.
Allow Batch/Serial No: If your item needs to be tracked with batch or serial numbers, check this box. Batch and serial number tracking ensures traceability and helps with quality control, especially for industries with strict regulations or serialized products.
Step 5: Purchase Settings
Optimizing your purchasing process requires configuring specific settings for the item:
Purchase UOM: Select the unit of measure in which the item will be purchased. This UOM may differ from the stock UOM, depending on how you manage your inventory and procurement processes.
Default Supplier: Choose the primary supplier from whom you usually purchase this item. Associating an item with a default supplier streamlines procurement and ensures that you maintain reliable relationships with key suppliers.
Step 6: Sales Settings
To facilitate smooth sales transactions and personalized customer interactions, you'll need to configure the sales settings for the item:
Sales UOM: Select the unit of measure in which the item will be sold. Like the purchase UOM, the sales UOM may differ from both the stock and purchase UOMs.
Default Customer: Choose the primary customer to whom you usually sell this item. Linking items to default customers streamlines the sales process and helps your sales team quickly identify the most relevant customers for specific items.
Step 7: Warehouse Settings
Efficient warehouse management is crucial for timely order fulfillment and accurate inventory control. Configure the following settings to optimize your warehouse operations:
Default Warehouse: Select the warehouse where this item will be stored by default. Allocating items to specific warehouse locations ensures efficient storage and easy retrieval when needed.
Allow Negative Stock: If you want to allow the item's stock level to go below zero, check this box. While this feature can help avoid stockouts, it's essential to monitor negative stock levels to prevent potential issues with orders and production.
Step 8: Pricing and Account Details
Proper pricing and accurate accounting are vital components of financial management in ERPNext. Configure the following settings to ensure precise financial tracking:
Default Buying and Selling Price: Set the default buying and selling prices for the item. These prices serve as the standard rates unless overridden in specific transactions. Carefully determine these prices, considering costs, market demand, and your overall business strategy.
Income Account: Select the income account where the revenue from selling this item will be recorded. Accurate income accounting provides insights into the financial performance of your items and overall business.
Expense Account: Choose the expense account where the cost of goods sold (COGS) for this item will be recorded. Properly tracking COGS allows for accurate financial reporting and helps determine the profitability of your items and business operations.
Step 9: Other Settings
In this step, you can configure additional settings to enhance item management and customize ERPNext to your specific business needs:
Has Variants: Check this box if the item has different variants, such as size, color, or material type. Enabling this feature allows you to manage diverse item versions with ease, streamlining inventory control and sales.
Default Material Request Type: If the item is a raw material used in your production process, select the default material request type for procurement. The material request type defines the purpose of the procurement request for the item, facilitating seamless raw material procurement.
Step 10: Save and Submit
After filling in all the necessary fields, click on the "Save" button to save the item as a draft. This action preserves your progress and allows you to make further edits if needed. Once you are satisfied with the item details, click on the "Submit" button to make the item active and usable within the ERPNext system.
Conclusion: Erpnext documentation
Mastering item creation in Erpnext documentation is a crucial step in optimizing your business operations. By following this comprehensive and user-friendly step-by-step guide, you can create and manage items with confidence, ensuring accurate inventory tracking, streamlined procurement and sales processes, and efficient financial management. Embrace the potential of ERPNext to revolutionize your business and achieve new heights of productivity and success. With the right item creation process in place, you are well-equipped to navigate the challenges of modern business and build a foundation for growth and prosperity


1.png)


.png)


0 Comments